Read this before using labels in Microsoft Planner
Labels in Microsoft Planner are limited so it's best to think about how you will use them before going label crazy.


Disclaimer: Some content generated by Claude.ai (herein referred to as "Claude") and more from a human named Otto.
One of Microsoft Planner's most underutilized and yet painful features is task labeling. This post will help you develop an effective labeling strategy that brings clarity to your projects and survives the test of time. But first, a quick note of thanks.
Labeling is trivial so why would Claude and I need to write an entire post about it?
Labeling is basic, right?
If you're like me and come from the world of Google or you've used Jira with their seemingly endless number of labels, you'll end up wondering what Microsoft was thinking when they built Planner.
Last week I spoke with someone on my team who's been using Planner for a month and they hadn't learned about labels as yet. Their organization technique of using buckets for each function was starting to break down and become cumbersome.
This got me to thinking that people could take time to design how they will use labels with Buckets at the start and that will pay off for them. This is especially true because Planner only allows 25 labels per plan, yes 25! I know, that's ridiculous and hopefully someone in the product team at Microsoft realizes how limiting that is.
If you think I'm the only one needing more tags, check out these 9 posts and please upvote them. Thanks to Karis Thoresen for finding them!
Adding more labels | Requesting to increase the 25 max labels limitation | Labels | Need more lables or just tags | Mehr Bezeichnungen/ Lables hinzufügen | Please increase the number of labels | Need more labels | More Color labels
OK, now that you know why you need to think about your labeling strategy, it's important to know that there is one other way to classify tickets in Microsoft Planner.
Understanding Planner's classification fields
There are a couple of different ways that you can categorize tasks in Microsoft Planner. The first is Labels.
Labels
A few things to note about labels:
- Color-coded tags with 25 colors
- Can assign multiple labels to a single task - but don't go nuts
- Visually prominent on cards in Board view
- Filterable in all views
To add the first label on a Task, click to the right of the tag icon where it says Search for label and it will show a menu of colors. Once you have one or more labels, adding another one is not obvious because that prompt is gone. Just click the white space to the right of the current label(s) and the menu will appear.
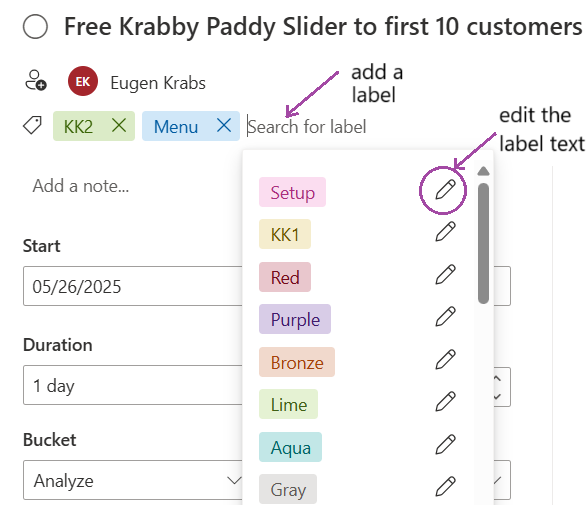
As that screen snippet shows, you can change the text by clicking the pencil icon. By default, labels have their color name as the label text, even though Grey is spelled incorrectly 😉.
Priority flags
Another field that can be used for categorization is the Priority flag which tells people how important a task is. Some things to note about this field:
- Four levels:
Low,Medium,Important,Urgent - One priority level per task
- Offers dedicated filtering options
- Displays as a small icon on task cards
The menu in the edit task dialog is shown here on the left and once set, an icon is added to the corresponding Task when it's displayed on a Board:

Custom field
A categorization approach that I have not tried is using a custom field. The main limitation with custom fields is that they're not visible through Planner integrations. It's not a concern if you're only working within Planner but if you plan to create Power BI dashboards etc. you will be unable to get that data out. I am avoiding using the field unless really needed so I won't talk more about it here. Maybe in a future post.
Use labels sparingly
The limit of 25 labels is very restrictive, but labels can still be useful to organize the work. Just remember that if you get too granular, then 25 labels won't be enough.
I suggest reserving a bunch of labels for the future. As mentioned above, once a label is used within a plan, it will be on old tasks in that Plan forever. So, if you change the text on a label, it changes that label on all of the old tasks that have that label: a nightmare.
Step 1: Decide on your primary categorization
Choose what dimension is the most important for your team when looking at the Tasks in the Board view. Here are a few examples of how to use labels and I'm there are other approaches depending on the domain and the industry that you work in.
Across all categories
I would be especially picky about where you use the Red, Yellow, and Green labels. My suggestion is to prescribe to the teams that they use these consistently across all plans:
Blockerin Red for tasks that are blocked and need attentionRiskin Yellow for things that could go wrong, warningsDonein Green for things that are in good shape or done, ready to be pulled to the next queue etc.
Option A: By department or team
This is my preferred approach but could be hard in large organizations which have 100s of departments so in that case, you could use a short version of the division names.
Mktgin Blue for Marketing tasksITin Pink for IT workSalesin LimeCxin Aqua for Customer ServicePeoplein Purple for leadership and people-related tasks. Plus, it's easy to rememberPartnersin Orange task related to external partners
You might have noticed the short label text I suggested. This is to reduce the visual burden on the Board view. Keep your labels to one word and short without making people think to much. For example, most people in our organization know that the short form Cx means Customer so that's a reasonable label.
Option B: By work type
Labeling by type of work can be useful to see which where the work is at in the lifecycle. I prefer to use Buckets for lifecycle.
Docin Blue for documentation related tasksDefectin Pink for bugs and issuesAnalysisin Lime for feature development e.g. value stream mapping, writing user storiesOpsin Aqua for production operationsResearchin YellowDesignin PurpleAdminin Orange for administrative work
Option C: By strategic alignment
This one I'm not sure I would use unless it's a small company. Since Claude suggested it, I'm leaving it in. For companies with many products, likely you'll end up with one or more plans for each of them.
Product Line Ain BlueProduct Line Bin PinkCostin Lime for controlling (reducing) costsRevenuein Green for increasing revenueCompliancein Black for regulatory tasksInfrain Purple infrastructure work
Option D: Your own way!
Look at your own organization, your specific workflow, and the structure and come up with your own approach. Just know that you shouldn't go too far without correcting.
If you ever want to change a label, you'd want to go back and remove it from old tasks that use it. I did that for a small initiative and it took me about an hour. On a large project, you'll likely never have the time.
Step 2: Create a label legend
Once you've decided on your labels, document them somewhere that is easily accessible and bookmarkable.
Claude suggested creating a task named "Label Key" and to keep it at the top of the first bucket. Not a bad idea. If you do, capture concisely what each label represents in the description field but don't assign this task to anyone or add any labels on it.
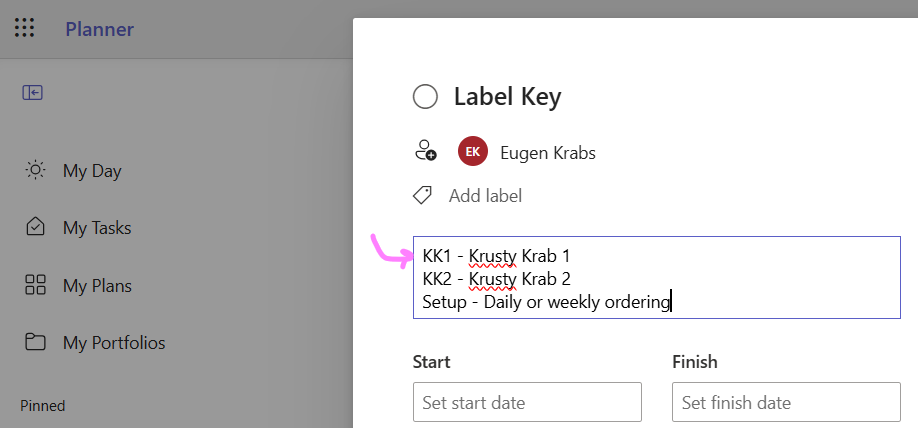
My preferred approach is to create a Microsoft Loop page, but you could create a small file or SharePoint page wherever you keep your project documentation. Share that page with everyone on the project and explain it at one of your meetings.
It's worth taking the time to share and explain the logic. Of course, if you ever change a label (bad idea), then let the team know as they may get used to just looking at the color.
Speaking of documentation, write down the strategy for labels.
Step 3: Document your labeling strategy
Create a simple document that answers:
- What labeling approach are we using? Work Type, Department/Team or Strategic Alignment
- When should labels be applied? (At creation or later?)
- Who is responsible for applying labels?
- What processes require specific labels?
Color-Code Tasks for visual management
Beyond just assigning labels, consider how to leverage them visually using label colors. Also, keep in mind people that someone on your team or project may be color blind.
Even across projects it can be helpful to have label guidelines so people moving between projects don't need to re-learn what the colors mean. If used properly, they can be very powerful.
For example:
Red+Yellow: Urgent bug that affects a major featureBlue+Lime: Documentation work related to customer-facing productsPurple+Orange: Design work involving external partners
Create a list of common combinations and their meanings to encourage consistent usage.
When to use Labels vs. Priority
Each classification tool has its strengths:
Use Labels when:
- You need the ability to visually scan tickets quickly
- The information should be immediately visible
- You want to filter on this dimension frequently
- Team members need to quickly identify task types
Use Priority when:
- You're specifically indicating urgency or importance
- You need to sort tasks by priority
Use Multiple Systems Together
- Labels for work type + Priority flags for urgency
- Labels for strategic alignment + Priority for business impact
Maintain consistency across multiple Plans
Keep your labeling consistent. You should define standards but some people like the freedom to have their own labels.
To balance the need for consistency across projects and flexibility for project managers, specify as few "standard" labels as possible they should use across all plans. Maybe define a handful of these labels so that teams have enough labels left for themselves. Other ideas from my AI friend Claude that I've edited.
Standardization techniques
- Template Plans: Create template plans with pre-defined labels
- Central Documentation: Maintain organization-wide label standards. I think that would be hard where I am with 5,000+ people!
- Periodic Audits: Review label usage regularly
- Onboarding Training: Include labeling conventions in team onboarding
Managing Plan-specific variations
Sometimes different plans need different labeling systems. When this happens:
- Document the reason for the variation
- Create a clear visual distinction e.g., different bucket structures
- Consider separating plans into different team contexts
Use Labels when filtering
Labels become especially powerful when used for analysis:
Creating focused views
Use Planner's filtering capabilities to filter the Grid or Board views like:
- All red-labeled tasks (bugs/issues) assigned to your team
- All yellow and lime tasks (features + customer service)
- All purple tasks (design work) that are blocked
In case you're new to Planner, filters are accessed here:

Once clicked, you will see each of the fields that you can filter on including Labels. In this case it shows I was filtering on (2) labels.
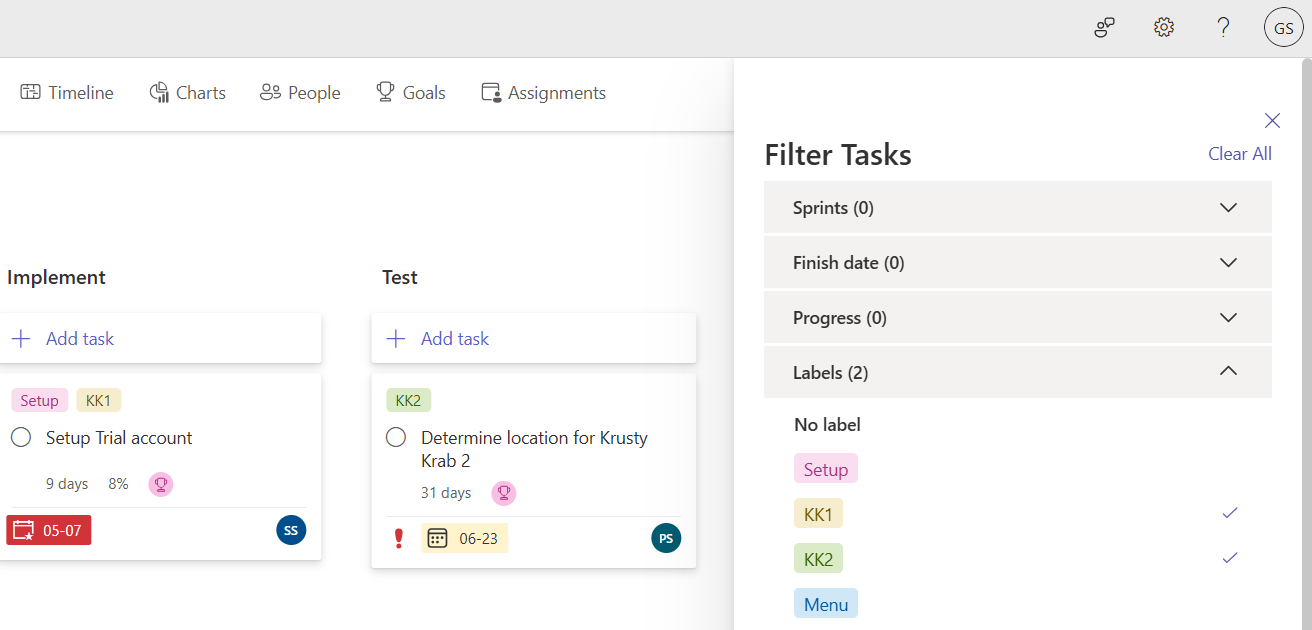
Unfortunately, when you close the filters, Planner doesn't tell you what filters have been applied. The good thing is that when you go between tabs Grid, Plan, Timelines, or Charts the filters persist.
I can't believe it, that's a lot of words about labels!
Winding down
A thoughtful, consistent approach to labels transforms Microsoft Planner from a simple task board into a powerful information management system. By establishing clear naming and color conventions, coaching and encouraging your team to be disciplined in using them, you'll gain valuable insights and improve collaboration.
Remember that the best labeling system is one that your team uses - so keep it simple, visual, and aligned with how your team naturally thinks about work.
What labeling strategies has worked well for your team?
Until next time here's my latest t-shirt and keep planning!